Thursday, December 29, 2011

Upcycling for Jessica

My daughter had several t-shirts from Target that she never wore.  Now they are out of season and will be too small to wear next summer.  I decided though, to upcycle them for her doll, Jessica.  I kept a few other t-shirts that were well worn also just in case I needed a little bit of knit fabric for embellishments.


These are some of the t-shirts I had to choose from.  One great thing about using children's t-shirts is that you already have several finished hems and seams to use.  Less work = more time = more goodies!


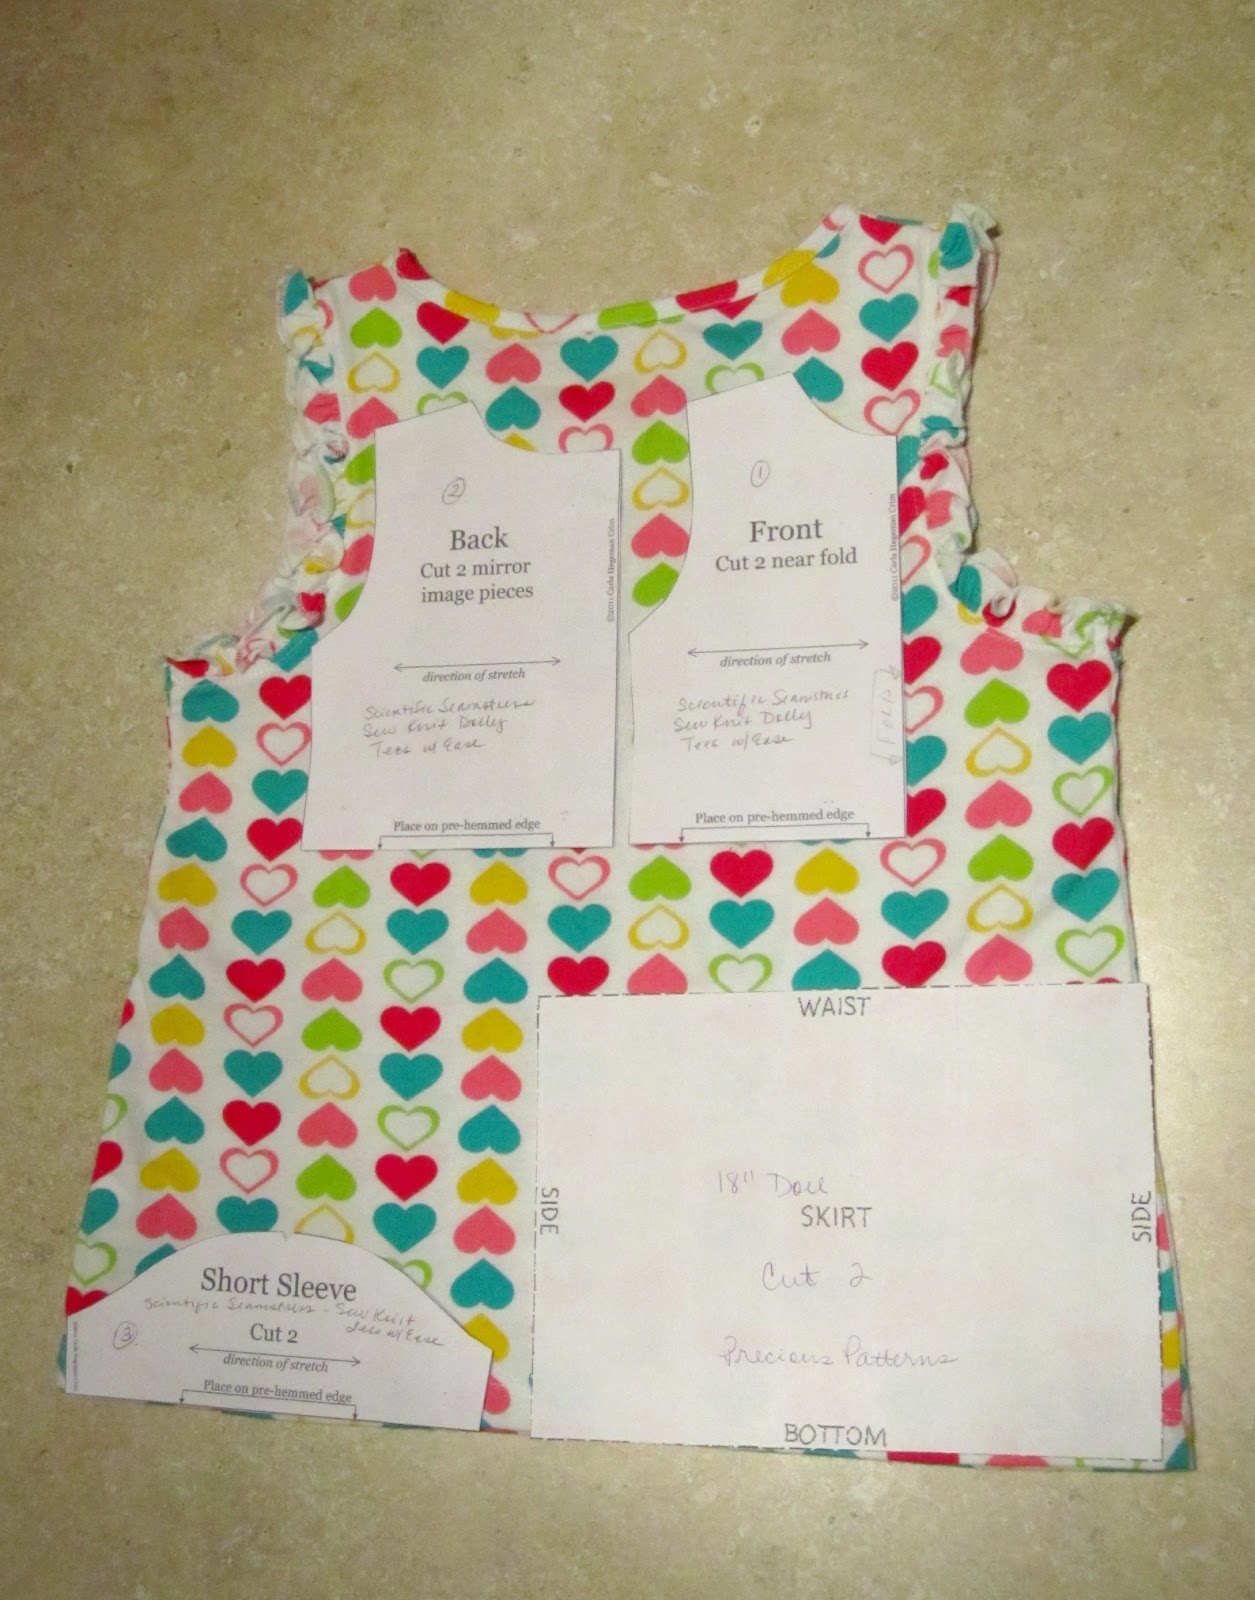
Below you can see that I was able to make a full short-sleeved t-shirt and a skirt from just one 5-T top.  The pattern I used is from the Scientific Seamstress and you can find it here.  She has other great patterns that I can't wait to try out.

As you can see, her pattern uses finished hems, which she shows you how to quickly make if you are using regular, unsewn knit fabric.  However, I just made use of what I had.  I deconstructed the top, and kept the ruffled pieces for later.  Since the top only has one hem to utilize, I chose to use it for the doll skirt and sleeves.  I just added length to the bottom of the doll top pieces and hemmed them separately. 


I loved the little flower on the 5-T top, so I cut it out and sewed it on to the doll skirt I made from the same top.  The lime-green stitching at the bottom along with the flower is so cute!  I don't think it shows up too much in the photo, but this little top was worn often by my daughter!  But, it has a new home and use and she loves it just the same.  So, don't overlook the gently used clothing you may already have to work with.


I added some trim to this little pink skirt and this little outfit actually went to my daughter's best friend for Christmas.


Another little skirt for Jessica...


The pink t-shirt had the sweetest little sleeves so I cut those out carefully and used them for doll sleeves.


Out of three t-shirts, I was able to make three skirts and two tops in just a few hours.  Hopefully soon, I will have time to use the yellow and green t-shirts to whip up a few more outfits.  


I hope you enjoyed visiting today.  Maybe this post has inspired you to upcycle some of your clothing into "new" fun things!  I'll be back soon to show you a quick method to make a doll skirt.
Pin It

Tuesday, December 27, 2011

Sunday, December 11, 2011

Holiday Garland - NOEL

I couldn't stand it.  I had to have a new Martha Stewart tool to add to my crafting arsenal.  Her tools are the best. THE BEST!  I bought the scoring board with paper medallions in mind, but wait... you can do so much more!  Like envelopes and boxes!  Yes!

Back to the topic at hand... since I decided to decorate with my Victorian ornaments this year, it threw off my whole plan and I had to (really forced to) make a new garland.  I usually hang something in front of my large mirror in the living room and last year I made a wreath for it.  Well, that wreath didn't match the tree this year so I had move things around a bit.  That wreath is now outside on the front door; the wreath from the front door is now in the kitchen; different garland on the front door and in the living room around the column - but its all good. 

So here's what I came up with...


I used another Martha Stewart tool - the circle cutter, to cut out my letters.  I used Word and the 'Carnival MF Open' font in a gold color to create the letters in N-O-E-L and my little dobber-doo-hickey and brown stamp ink to "age" the edges around each letter.  Cream card stock was used for the letters and double-sided scrapbook paper for the medallions.


Making the medallions was super easy, but I did have a little difficulty hanging them.  I was originally going to use some red and white baker's twine.  However, I spaced them too far apart and even though I glued the twine toward the top of each medallion, they were top heavy and wanted to lean forward.  It just didn't look good.  


So, I ripped off the twine and decided to use the gold ribbon instead.  Since they lean forward and are against a mirror where the back of the garland can be seen, I decorated the back sides as well.  You can't see it in the photo below, but I also dobbed brown ink around the edges of each of the circles.  I punched two holes in each circle to run the ribbon through, then glued them to the backs of the medallions.  It turned out much better. 


Excuse me?  Did I actually get a picture of it hanging on the mirror?  Ummmm, on my cell phone... yeah.  Do you know how hard it is to take a photograph looking into a mirror?  Without getting all that stuff you don't want to show?  Like ceiling air vents, the fan, or an adjacent room?  Ha!  Well, you'll "get the picture"!


Have a great weekend!
Pin It

Saturday, December 10, 2011

Holiday Pillows - Fa La La

My BFF Harriet and I made some super-cute holiday pillows last week and I couldn't wait to show them off.  I like to change out the pillows in my living room during the year and found that just making slip covers is so quick and easy. 


This is Kitty Moo-Moo.  She's chillin' like a villain, eh?


I used the freezer paper method for both pillows.  After I typed up my pretty "fa la la" in Word and sized it to my liking, I printed it out and traced it onto the matte side of the freezer paper.  For the carolers, I did a little work in PhotoShop to get the silhouette, and again traced it to the freezer paper.  Then, I used a craft knife to cut out the pieces where I wanted to paint.  I used an iron without steam to iron the shiny side of the freezer paper to the fabric (I used unbleached muslin).  I turned the fabric over and ironed from the back side as well to make sure all the bubbles were gone and it was nicely and evenly adhered.  Using Plaid Simply Screen water-based screen printing paint (found at Hobby Lobby for under $3.00) and a sponge brush, I painted in the areas and let them dry for a few hours.  The freezer paper pulled right off with no problems.  The next day, I used medium grit sand paper and lightly sanded over the painted areas to give them a vintage look.  That's it!  This would be a wonderful technique to use on hand towels as gifts for Christmas.

Go here for Char's 'Faux Feed Sack Pillows' post about the project she made using the new Cameo.  I don't have the Cameo so I just made do, but wouldn't that be a fun little machine to use?  You can also use a Cricut or Silhouette if you have one.
Pin It

Friday, December 9, 2011

Tis the Season - 2011

The house is all decorated - a tree in every room!  This year I decided to decorate the living room tree with my Victorian ornaments.  My mom helped me collect some of these over the years and I enjoyed getting them back out and reminiscing.


A few things from the kitchen, although most of it is decorated the same as last year.


And in the studio... We love the movie, The Grinch starring Jim Carey and this is one of our favorite quotes.


I'll be back soon with a few projects that I did manage to fit in this holiday season.  Thanks for coming by! Pin It