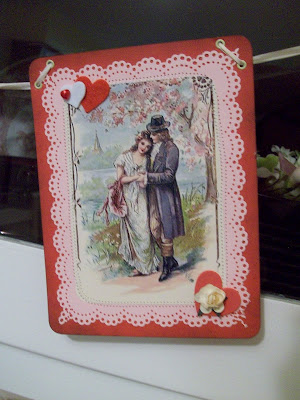
I've been working on this Valentine banner off and on for a few weeks. Finally! And no, I'm not terribly late in getting this out - I'm very early for next year! But, the techniques can be used to make a banner for any time or holiday of the year. So, I hope you enjoy!
Gather up your goodies:
ruler
glitter
pencil
thread
scissors
edge punches
stamp pad/ink
paper trimmer
sewing machine
accents/trims/buttons, etc.
hem tape, ribbon, or cord
Valentine photos or cards
cardstock in different colors
Get crafty:
1. Pick out photos from cards, magazines, CD's, or from the internet that you would like to use on the banner. (I printed mine from a CD that has royalty free clip-art. The photos are each 3 1/2" x 5" and I trimmed edges right to the photo and rounded the corners with a cutter.)
2. Prepare the "lace" piece that will go behind the photo. Cut the cardstock 5" x 6 1/2" and then use an edge punch or decorative paper crafting scissors to trim the paper to resemble lace. (I used Martha Stewart's Doily Lace Edge Punch and I alternated between pink and cream cardstock.)
3. You can stop here, or add another piece of cardstock behind the one in step 2. From a contrasting color, cut this piece 5" x 6 1/2" and round the corners if you like.
4. Using a sponge or the corner of a paper towel, apply ink from the stamp pad to the edges of the bottom piece of cardstock to give it an "aged" look. Lay the cardstock on a scrap piece of paper to keep the work surface clean. (I used brown pigment ink.)
5. It is time to sew the layers together. You can also use glue or double-sided tape. Use a zig-zag stitch (width 2.5 and length 1.0) and a universal 80/12 needle - start at one corner, and work your way around the photo. The stitches do not have to be super straight - this is part of your artistic license.! Keep your machine in the needle-down position to avoid the paper moving when you are turning corners or stopping. (I put a small piece of double-sided tape between the layers just to keep them in place until they were stitched.)
6. Insert grommets at the top corners of each card to run a ribbon through. You can also punch holes or make slits. (I put two grommets at each corner so that the ribbon was less visible in the front.)
7. Run the ribbon through and space evenly. (I used cream-colored 7mm silk ribbon.)
8. Embellish your cards with buttons, trim, glitter, bits, and baubles - whatever you can find in your stash! (I didn't glitter these - but I think I will go back and do that!)
9. Hang 'er up and enjoy! Or, whip one up for a friend!
I've used other sewing techniques on banners for birthdays, Halloween, and Thanksgiving and will show some of them in another post. I hope to make an Easter banner soon and will post it much earlier!
Happy Valentine's Day!
Mona Pin It


Mona,
ReplyDeleteBeautiful banner. I can't wait to make one.
Thank you so much,
Carolyn
Listen girl. I love the banner . I think this one is the best yet . Can't wait to see the Ester banner. Thanks,Harriet
ReplyDeleteWhat a wonderful banner! Thanks for showing us how you did it--beautiful job!
ReplyDeleteHappy Valentine's Day! What a beautiful banner and the best tutorial. I'm late for this year, but great for other holidays.
ReplyDeleteTake care,
~Karen~
Mona, this is so beautiful! I will try it next year.
ReplyDeleteMona,I love your banner and hope to make one very soon. Very informational tips. I've never made one, so thank you for the tips. I like the way you use the grommets on paper, neat idea.
ReplyDelete