Wednesday, November 30, 2011

No way!

I must have been an extremely good girl this year, cuz Santa came to my house early!  I was "random number" for a giveaway not once, but twice!

First, I received an email from the lovely Paige Hill, Internet Marketing Manager of Where Women Create, letting me know that I was the winner of the AccuQuilt Go!baby from their Fabulous Friday post in November.


I started squealing, jumping up and down, and carrying on.  My husband came to see what the ruckus was all about.  I explained in great, but exasperated detail (from the prior jumping around), but still I got that, "oh that's nice, dear" look.  He didn't "get" it.  But, he will after I dazzle him with all the projects I'm going to fly through!  Can I get a "uh huh, you know that's right"?

To sweeten the pot, AccuQuilt let me pick the three dies that I wanted!  More squealing.  That was a difficult choice.  So many cool dies to choose from.  I opted for "Rose of Sharon", "Funky Flowers", and "2 1/2" Strip Cutter".  I have been wanting to make a new quilt for my daughter's room and these will be perfect.  I was going to have to cut a bazillion flowers out by hand, but not so much now!  I thought the 2 1/2" strip cutter would be great for making bias, too.

I received everything yesterday, but before I could even get it out of the box to play, I got an email from the sweet Stephanie Brieger, Assistant Marketing Director of The Fat Quarter Shop and Jollly Jabber that I was the winner of Pam Kitty Morning's Designer Select Fat Quarter Bundle!  Okay, at this point, I was just giddy and giggling.


Could these two be paired any better?  I could whip up a fabulous quilt in no time at all!

I would like to thank Where Women Create, Accuquilt, Pam Vierira-McGinnis of Pam Kitty Morning, The Fat Quarter Shop, and The Jolly Jabber for such wonderful gifts.  If you haven't already checked out all these fine folks, I encourage you to do so.  Hop on over to follow their blogs, Facebook pages, and Twitters.  They always have wonderful news to share and fun projects going on all the time!  I met Lee from AccuQuilt at the Houston Quilt Market.  He's so knowledgeable about AccuQuilt products and very passionate about what he does. I was ready to buy the whole kit-n-kaboodle and I don't even own a shop!  This was truly a gift for me.

I'll be back soon to share the projects.  With all this luck floating around me, I'm wondering if I should go buy a few lottery tickets!
Pin It

Monday, November 21, 2011

Chalkboard Tablecloth

Have you tried chalkboard fabric?  It is wonderful and has so many uses like the one in my last post.  BFF Harriet gave me a roll of this wonder fabric about a year ago.  I kept waiting for that "perfect project" and finally found it.  I saw something similar on Kellie McCants Oilcloth Addict blog.  I would love to get my hands on her book, Sewing with Oilcloth (hint, hint Santa). 

Anyhoo, until I get the book (uh hem, Santa), I made my own pattern.  I taped lots of sheets of paper together.  Don't worry - I used paper from the "scrap" box.  They just happen to be flipped over to the plain side.


I used a standard dinner plate to draw my "scallops".  I just kind of eye-balled them!


I then cut out my scallops and took a look-see to make sure it looked okay.  I didn't take pictures of the next steps, but did this to complete the project:  turn the chalk cloth over and lay the pattern on top; using a Sharpie marker, trace the pattern; cut out with pinking shears.


Next, you will need to "prime" the chalk cloth.  With a piece of chalk on its side, go back and forth all over the chalk cloth until it is covered with chalk.  Use an eraser to erase most of the chalk.  Then, use a damp sponge or cloth to take the remaining chalk off the chalk cloth.   It may take several times of wiping to get it back to a clean black surface.  Kitty Moo-Moo was supervising.


Keep rinsing out your sponge or cloth and re-wiping or it will look "chalky" like the photos below.  The chalk cloth is now ready for some doodling, artwork, menus... whatever you can create!


I left my kiddos a little message for the next morning.  (I like to sing the little song, "Good morning to you, good morning to you.  We're all in our places, with bright, shining faces.  Good morning to you!")  They had lots of fun chalking it up the next day.  


I decided the tablecloth was too big, so I cut a little more from it to reduce the size.  When not in use, I just roll it back up and store it with the bolts of fabric that stand upright in the corner of my studio.  You don't want to crease your chalk cloth!

Chalk cloth can be found in fabric stores and online.  You know, just "Google it"!  You'll also find lots of tutorials and ideas for using chalk cloth.  Have fun with it!
Pin It

Sunday, November 20, 2011

Pumpking Tasting Party

Yes, we had a Pumpkin Tasting Party!  And, I believe we'll make this some sort of tradition!  BFF Harriet and I love all things pumpkin (although I'm more of a pumpkin freak!) and so we decided to host a small tasting party that was "all things pumpkin". 


For those of you who enjoy a good slice of pumpkin pie, but just cannot imagine anything else pumpkin-related, check out our delightful menu...


Our sweet guests brought these delicious additions...


Menu

Pumpkin Butter with Almond Thins
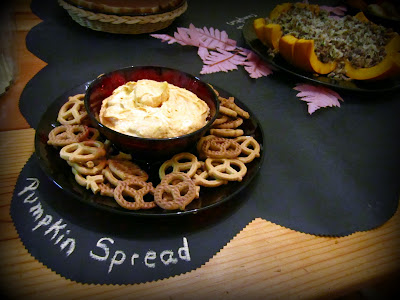
Pumpkin Spread with Cinnamon Pretzels
Pumpkin Pasties
Pumpkin Bread
Pumpkin Soup
Stuffed Pumpkin with Wild Rice & Sausage
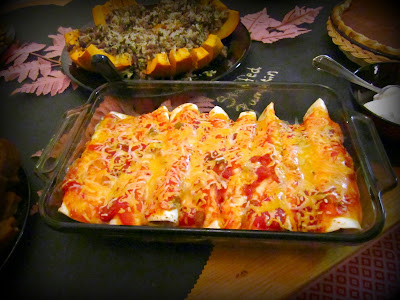
Pumpkin Enchiladas
Southwest Pumpkin Burgers
Pumpkin Pie
Pumpkin Bundt Cake
Pumpkin Pie Punch
Harvest Pumpkin Ale


From our homes to yours, wishing you a
Happy and Safe Thanksgiving!

Pin It

Tuesday, November 15, 2011

Paper Garland Tutorial


I've seen quite a few tutorials on how to make paper garland and somewhat merged a few ideas to come up with my own garland.  I'm sure someone else has posted this out there in Blog Land, but here's my take:

Supplies:
card stock or double-sided scrapbook paper in various colors/patterns
circle cutter
sewing machine
thread - All Purpose is fine
ribbon

1.  You will need at least three circles for each garland set.  My garland was approximately 45" long and had 30 sets, so I cut out 90 circles.  (I cut all those bad boys whilst watching TV one evening!)  The circles were 1" in diameter, but I think 2" circles would be nice also.  I laid the circles out in sets of three and varied the colors and patterns.


2.  Set your machine to straight stitch and a stitch length of 2.5.  Pull out a long length of upper and bobbin thread - about 12 inches or so, and lay them to the back of the machine.


3.  Stack three circles together and place them under the presser foot just in front of the needle.  Slowly lower the presser foot and while continuing to carefully hold the circles in place, begin to sew through the circles in a straight line.


4.  After you have sewn through the first set of circles, continue to sew about one inch before you add another set of circles.  I left about one inch between sets, but you can have your sets closer or further apart.  Continue sewing until all sets have been sewn.


5.  When you are finished, tie a sturdy knot at the beginning of the garland close to the first set of circles.  Tie another knot in the same way after the last set of circles.  

6.  You are now ready to separate the circles and fan them out.  Gently pull the side pieces away from the centers.  Use your fingernail or a bone folder to push them away from the center, or pinch them in the opposite direction.  The stitching will be fairly tight and will keep the papers from folding back inward.


7.  Tie pretty ribbons at the ends of the garland, hang, and enjoy!


I'm off to make more garland for Christmas!  See you soon! Pin It

Monday, November 14, 2011

Int'l Quilt Market - Fall 2011 - Part 3

Thanks for hanging in there.  This is my final post on quilt market.  I hope you've enjoyed it!


 I've never worked with wool before, but after seeing what the Gail and Lisa of Wooly Lady had to offer... I simply must!  All of their wool is hand-dyed.  It was so soft with the most vibrant and variegated colors.  They have many beautiful kits to choose from, too.  Love, love!

"Stitches" from Betz White is a super-fun collection.  I can't wait to see what cool things come from this line.


 I loved every single thing about " "Daisy Cottage" from Lori Holt (Bee in my Bonnet).  The colors are so sweet and it was all tied up with a pretty, vintage flair.


 Harriet and I couldn't help but stop by this lovely booth to meet authors Bonnie Sullivan and Kathy Schmitz.  Their new book "French Inspirations" is a pleasure to read.  Harriet got her copy right away and I can't wait to steal borrow it soon!


 "Power Pop" by designer Jenean Morrison.  She cut all those cute flowers out by hand!  And, she had tiles made to resemble quilt blocks.  Great booth!

Bummer, I missed meeting Sandi Henderson.  I've always admired her fabrics. Sandi is showing off her laminates from "Secret Garden".  Delicious!


Anna Griffin's booth full of wonderful fabric.  She had quite the audience, but we happened to come along later when she wasn't so busy and had the chance to meet her and purchase some fat quarter bundles.  Harriet grabbed the "Pinelope" collection and I opted for "Francesca".  I'm still petting it.  I have no idea what I'll do with it, but that doesn't really matter, right?  It looks pretty in my studio!  Anna was so friendly and fun to talk to.

Riley Blake had great displays and this one is "Delighted" by Amanda Herring of The Quilted Fish.  If you haven't already checked out her blog, go over soon.  She's done some pretty fun stuff already with her new collection.
Yeah, we had to.  It's just not that often that we get to hang with the Cat in the Hat!

Of course, we were at QUILT market and so I would be remiss if I didn't share some of the amazing quilts.  Pictured below are the ones that just blew me away.  I cannot imagine the hours these artists must have poured into their artwork.  Just amazing.

 "Time" by Sue de Vanny, Greenvale, Victoria, Australia

 "Element 1: Earth (Persephone)" by Sheila Riess, Ellicot City, MD - Best of Sulky, 1st Place

 
 "Eliza, the Flower Girl" by Gayle Griffith, Philadelphia, PA - www.hoffmanchallenge.com.  This doll is precious and her facial features are so detaiiled.

"Everlasting Bouquet" by Molly Hamilton-McNally and Cindy Seitz-Krug, Tehachapi, CA - EZ Quilting by Simplicity Creative Group, Innovative Applique.

Thanks again for stopping by!  I have something fun to share with you in my next post so I hope you'll come back to check it out! Pin It