Monday, February 22, 2010

Ooooh, this sounds like fun!

A tisket, a tasket - I'm gonna make a basket!!


... or two!  Really, I don't know when I'm going to fit this in... but I HAVE to!  All the other stuff is just work, right?  This is "fun time"!  Thanks to Mary, I found out about this great Easter Basket Swap at Miss Rhea's.  I've already signed up!  (And, I love her name.  My kids' friends all call me Miss Mona - its a southern thang.)

I'll start gathering goodies today.  Right after I take out the banana-chocolate chip bread from the oven, pick up kids from school, drop off one at driver's ed, take my son to Tae Kwon do, make dinner, clean up, get kids to bed........ well, soon anyway!

Let me know if you're thinking about joining in on the fun, too!

Mona Pin It

Saturday, February 20, 2010

New Blogs and Cool Giveaways - Spreading the Blog Love!

I'm so, (sew) excited to have stumbled upon some great new blogs.  And, I'm sure that will give way to even more great new blogs!  I have lots of different interests including sewing, crafting, and photography.  Well, I recently found some blogs that feature heirloom sewing and ribbon arts.  So much fun!  My blog list is just a wonderful mix of all kinds of talents!  I love sitting down during stolen moments to catch up on all the new posts that hit daily.

Below are a few of the blogs I've recently found.  And, I see quite a few familiar faces of followers among those blogs.  Hey everybody!  It really is a small, small world!  I didn't add pretty pictures from each blog (I would rather have their permission first), but you can pop over real quick with the links and check them out.


Giveaways - they're all over.  Faaaaahbulous giveaways, too!  I'm crossing my fingers - for even just one of them!  I'm the type of person who never wins anything, so if I do - I may faint!  Go check these out if you haven't already!


I hope you all have a wonderful weekend.  Maybe the weather will be pleasant... I hear there is SNOW in our forecast again here in Texas!

Mona Pin It

Friday, February 19, 2010

My first photo montage!

While traveling abroad in Blog Land, I have seen so many creative photo mosaics and decided to make one of my own.  I pulled a few pictures from my Flickr page and came up with this:


I made this dress for a Martha Pullen Sewing Market contest last year.  I incorporated French heirloom techniques with modern styles and fabrics.  The over-skirt is Swiss batiste with French lace insertion, cream ribbon, and French lace edging.  I also hand-embroidered silk ribbon flowers and added a machine-embroidered motif to the batiste. The bodice is a beautiful Robin Pandolph cotton fabric and the underskirt is a soft pink and white lattice print.  The straps are creamy grosgrain ribbons that tie in the back.  I finished off the skirt with a pink and brown striped bias trim. 

I really didn't expect to win the contest.  Well, I did want to win - there was a top-of-the-line Babylock sewing machine just waiting to be had!  It was a tough contest for this entry though.  It fell under the categories of machine embroidery and hand emboridery, but it didn't even compare to the other entries which were amazing christening gowns and smocked works of art!  I would have robbed the winner of her prized sewing machine, but doggone it - she really deserved it!   Maybe I'll catch the prize this year!

But, I had fun making the dress and it really motivated me to be creative and work on techniques that I had not done before or in a long while.  So, now it is in my Etsy shop and I am hoping that somebody will fall in love and adorn their little angel in it - maybe for Easter!  Uh hem... hint, hint.

I  haven't sewn much lately (and I ache to do so), but I've been dabbling a little with felt play food again.  My youngest daughter will be having a Pinkalicious Tea Party for her 4th birthday and I am making little party favors.  I'll post more on that later!

Thanks so much for stopping by -  I appreciate the visits and comments!

Mona Pin It

Wednesday, February 17, 2010

Ironing Board Makeover!

I just couldn't take it any longer!  I was in the mood to craft or sew or just something!  So, I set out to "pretty up" my ironing board!  Yes, my ironing board.  I guess I had put this off for a while because I really didn't want to spend a lot of time on it.  But, it was such a quick and easy project!

You know how you see something and think, "Wow, that's cool - why didn't I think of that?"  I never thought about making a new cover until I saw Jona's post.  Well, duh!  So, I bought the fabric and set out to do it.  But, when I started pulling the cover off of mine to use as a pattern, I saw how mine was made and just copied it's design.  Jona's is waaaay prettier and has a more polished look, but I was going for a quick fix of "craft" and this is what I did:

Goodies you'll need for a compact/table top ironing board:

1/2 yard Cotton or decorator weight fabric
1/2 yard Ironing board material (silver, also used in potholders)
3 yards drapery cording
upholstery needle
serger


What to do:

1.  Pre-wash your fabric, dry it, then iron it nice and smooth (one last time on that old cover!).

2.  Using your old cover as a pattern, lay it on top of your material and cut around it leaving about 1/2 to 5/8 inch.  If your old cover has elastic sewn in to it, either take out the elastic to flatten it out, or just lay your ironing board on top of the material and cut around it leaving several inches (after serging about 1/2" off, you should still be able to wrap it over the edges.)


3.  Using your new material as a pattern, cut another piece from the ironing board material that is about 1/2 inch smaller than the top cover.

4.  Serge around the entire piece using a 4-thread overlock.  When you get to the beginning, just serge off with a tail, tie a good knot in the end, and cut off the excess.  (I did not serge the ironing board material with the top piece.)


5.  Using an upholstery needle or one with an eye large enough to pass the drapery cording through, thread the cording through the serger threads on the underside of the material.  I found the middle of the cording and at the back of the ironing board I started threading that half of cording around to the front of the cover.  Then, I did the same with the other side.  This keeps you from having to pull large amounts of cording all the way around.  (I used a plastic needle that came in one of my children's felt sewing projects!)


6.  Lay the top piece right side to the table, lay the ironing board material right side down on top of that, and then lay the ironing board over the two layered pieces.  (I left one of my old covers on for extra padding.)

7.  Cinch up the cording real tight and tie it off.  You may need someone to help you hold the cording while you tie it.


That's it - voila!


I just love it when a project actually takes less time and works out the way you want!!  

Happy ironing!

Mona
Pin It

Tuesday, February 16, 2010

What a fun day!

I hope you all had a lovely Valentine's Day.  I had lots of fun - it was action-packed!  I made up little goody bags for the kids.  It's always fun to wake up on any holiday to find a little gift, right?

My husband went over the top this year and got me a few of my favorite things... a Starbucks gift card, a JoAnn's gift card and the coolest book - Layered, Tattered, & Stitched.  He went to Borders and searched and researched for this one!  Flowers are always beautiful and sweet, but he did good with all of these!


I also went on a photo field trip for the digital photography class I'm taking.  It was cold, but worth it!  And, as a bonus, my oldest daughter (bless her heart) went with me.  She is an awesome assistant!  We went to the Fort Worth Botanic Gardens and then ran over to the Japanese Gardens for these shots.  I knew this was a rare opportunity to catch snow in the gardens.  And, we found a little friend!  He was literally inches from my camera!


Then my second oldest daughter and I took my girl friend to lunch to celebrate her birthday.  She also brought her daughter who just happens to be best friends with my daughter!!  And another friend of mine was also able to join us.  It was so nice to see these ladies - we used to do kick-boxing and Tae Kwon Do together and rarely see each other any more. 

And to finish the day, we had a nice visit from my dad.  He drove in to see us for a bit and we just visited while we sat and looked at photos.  What a day!  

I hope you'll come back to see my next post - a quickie makeover project that everyone can use!

Mona Pin It

Sunday, February 14, 2010

Saturday, February 13, 2010

Friday, February 12, 2010

Ode to Love - Countdown #3

For you see, each day I love you more
Today more than yesterday and less than tomorrow.
~ Rosemonde Gerard

  Pin It

Thursday, February 11, 2010

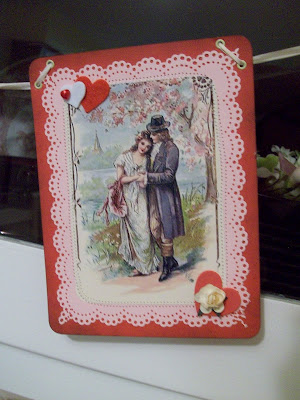
Valentine Banner Tutorial

I've been working on this Valentine banner off and on for a few weeks.  Finally!  And no, I'm not terribly late in getting this out - I'm very early for next year!  But, the techniques can be used to make a banner for any time or holiday of the year.  So, I hope you enjoy!

Gather up your goodies:

ruler
glitter
pencil
thread
scissors
edge punches
stamp pad/ink 
paper trimmer
sewing machine
accents/trims/buttons, etc.
hem tape, ribbon, or cord
Valentine photos or cards
cardstock in different colors


Get crafty:

1.  Pick out  photos from cards, magazines, CD's, or from the internet that you would like to use on the banner.  (I printed mine from a CD that has royalty free clip-art.  The photos are each 3 1/2" x 5" and I trimmed edges right to the photo and rounded the corners with a cutter.)


2.  Prepare the "lace" piece that will go behind the photo.  Cut the cardstock 5" x 6 1/2" and then use an edge punch or decorative paper crafting scissors to trim the paper to resemble lace.  (I used Martha Stewart's Doily Lace Edge Punch and I alternated between pink and cream cardstock.)


3.  You can stop here, or add another piece of cardstock behind the one in step 2.  From a contrasting color, cut this piece 5" x 6 1/2" and round the corners if you like.

4.  Using a sponge or the corner of a paper towel, apply ink from the stamp pad to the edges of the bottom piece of cardstock to give it an "aged" look.  Lay the cardstock on a scrap piece of paper to keep the work surface clean.  (I used brown pigment ink.)


5.  It is time to sew the layers together.  You can  also use glue or double-sided tape.  Use a zig-zag stitch (width 2.5 and length 1.0) and a universal 80/12 needle - start at one corner, and work your way around the photo.  The stitches do not have to be super straight - this is part of your artistic license.!  Keep your machine in the needle-down position to avoid the paper moving when you are turning corners or stopping.  (I put a small piece of double-sided tape between the layers just to keep them in place until they were stitched.)


6.  Insert grommets at the top corners of each card to run a ribbon through.  You can also punch holes or make slits.  (I put two grommets at each corner so that the ribbon was less visible in the front.)


7.  Run the ribbon through and space evenly.  (I used cream-colored 7mm silk ribbon.)


8.  Embellish your cards with buttons, trim, glitter, bits, and baubles - whatever you can find in your stash!  (I didn't glitter these - but I think I will go back and do that!)


9.  Hang 'er up and enjoy!  Or, whip one up for a friend!


I've used other sewing techniques on banners for birthdays, Halloween, and Thanksgiving and will show some of them in another post.  I hope to make an Easter banner soon and will post it much earlier!

Happy Valentine's Day!

Mona Pin It

Texas Snow!

We've had a wonderful day with real snow!!!  Not just a little blanket, but snow - all day, big chunky snow!  What fun for the family and how beautiful, too.  Below are a few pictures I captured today.


It has been snowing all day and night and I can't wait to shoot some more tomorrow!  Stay warm!

Mona
Pin It

Ode to Love - Countdown #4

I've fallen in love many times... always with you.

~ Author Unknown

Pin It

Wednesday, February 10, 2010

Ode to Love - Countdown #5

If I had a single flower for every time I think about you, I could walk forever in my garden.
~ Attributed to Claudia Ghandi

  Pin It

Tuesday, February 9, 2010

Ode to Love - Countdown #6

For twas not into my ear you whispered,
But into my heart.

Twas not my lips you kissed,
But my soul.

~ Judy Garland

  Pin It

Monday, February 8, 2010

Ode to Love - Countdown #7

Love is a canvas furnished by Nature and embroidered by imagination.
~ Voltaire

Pin It

Talk about sweet!

My dear friend, Harriet gave me the sweetest gift this year for my birthday.  (Well, she always does!)  But, this year she put a lot of extra hard work in to making me the coolest miniature mannequin!


And, she decorated it to coordinate with my studio.  Isn't she the bestest BFF?!

Thanks Harry!

Love,
Mo Pin It

Sunday, February 7, 2010

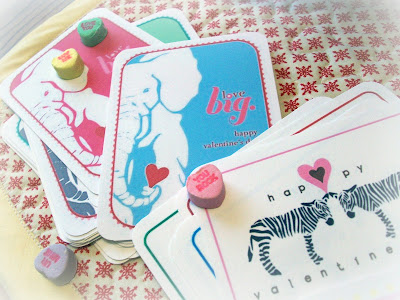
Cute, easy, & fun Valentine's cards!

I'm not big on re-inventing the wheel.  So when I found the cutest Valentine's cards over at Bunny Cakes, I thought it would be fun to make our own cards this year.  She has several designs and templates that you can download to make your own!  Go here for directions on how to make them.

All the design work has been done, so it was just a matter of assembly!  I let my 3 and 7 yr. olds pick out the ones they liked and I chose the traditional candy hearts and my personal favorite, M & M's to fill the bags.


I just downloaded the templates, printed them on heavy cardstock, and added names (or you can have the kids sign their names - good practice).  Then I used 3" x 4" celllophane bags from Michael's, punched holes, and tied them together.  I looked for baker's twine but couldn't find any, so I just used white ribbon.


Maybe you will be inspired to get crafty with your Valentine's cards this year, too!

Sweetly,

Mona Pin It